
Gila window film can help save money on your AC bill.
Gila window film is supposed to save money on cooling your house. Before we had a solar photovoltaic system installed, we wanted to make sure to get our electric usage as low as possible so we could install (afford) a system that would cover most, or all, of our electrical usage. We installed The Nest earlier in the year and saw some huge savings in our heating (gas) bill and some on our electric as well. I also wanted to try Gila window film as well to see if it could save us even more.
Gila Window Film Cost and Options
I purchased Gila Heat Control Residential Film at Amazon.
- A fifteen foot roll runs about $33 ($2.20/foot)
- a one hundred foot roll runs $144 ($1.40/foot)
I wanted to do every window in my house so I bought the one hundred foot roll of Gila window film. It turned out that I needed 70 feet of the film, which would have been 5 fifteen foot rolls with 5 foot leftover ($165) or 1 one hundred foot roll with 30 feet leftover ($144). I went with the cheaper option with more of the Gila window film leftover and I passed it on to family members after I finished my windows.
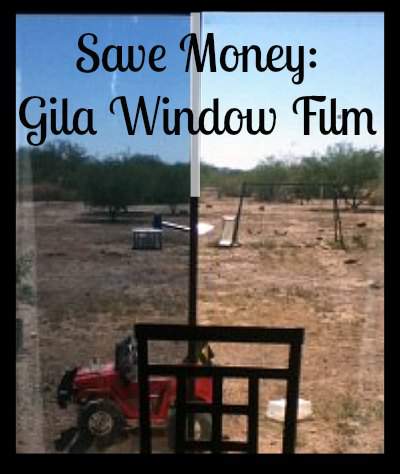
I bought the light Gila window film because I didn't want the windows to darken too much. There is a platinum film that cuts cooling costs even more, but if you use it you will have to accept a darker color on your windows. The picture at the top of this post is of my sliding glass door after I applied the Gila window film to the left side. You can see the color difference for the light film. I purchased it from Amazon, but Home Depot also sells it (although it was more expensive at my local Home Depot than Amazon was). There are many different types of window films so look for one that actually says Heat Control.
How Gila Window Film Works
Gila window film works by reflecting the sun off the window. The inside shows a shaded color and the outside shows a mirrored surface. This means that during the daytime the window film will also add some privacy due to the reflection of the sun. As you can see from the picture, it does darken the window, but not by a lot. If anything, it casts a bluish tint more than actually darkening it.
The window film reflects 99% of UV. If you are worried about plants, don't be, I set my starters in front of the slider as usual and saw no difference compared to the non-tinted side. The scientist in my made me leave only half of my sliding glass door finished for a couple weeks in order to make sure. Both the starter plants in front of the normal window and the one in front of the window with the Gila window film were the same size.
That said, you definitely notice a difference in the heat between the two! In fact, a thermometer was reading 26 degrees lower in front of the tinted window. I can comfortably sit in the dining chair in the picture now. Before I applied the Gila window film, you felt like you were being cooked if you sat in that chair!
The film says it will cut cooling costs up to 30%. I measured our AC usage before the window film was applied and again afterwards (using The Nest since it will tell you exactly how long and when your AC kicks on) and saw that the window film cut our cooling costs by 15%. Depending on your own air conditioning usage and window placement it might save you more or less. There is definitely also value in the fact that the house is also more comfortable, especially in the dining room.
The description also says that the Gila window film will reduce glare (it does) and fading of interior furnishings (which I can't really measure, but it makes sense because there is less direct sunlight coming through the windows).
Application of the Gila Window Film
Application of the Gila window film was really simple! I applied it to the first window (the sliding glass door) with my husbands help, but I did all the others while he was at work, including the second half of the sliding glass door.
I did purchase a Gila window film application kit and I recommend getting it. The supplies in the kit are pretty simple:
- squeegee
- low lint cloth
- cutting tool
- application solution.
You can make the application solution with water and a tsp of baby soap, which is what I did once the first bottle of solution ran out. If you have those supplies on hand you will not need a kit, but make sure you have them. Once the Gila window film is applied you are stuck with it. If you have a crease or cut in the film it will easily be seen. The importance of the squeegee and cloth surprised me. The application solution is easy to make, but the commercial version was a little easier to use so I was glad to start with that.
Steps to apply Gila window Film
- Measure the window and cut the film. Cut it a little larger than the window so you have some room to work with, but not so large that it is hard to keep straight (I left myself about four inches on either side).
- Use a TON of the solution when peeling the backing off the window film. The film is not sticky as long as it has the solution on it, but it will stick to itself if you do not use enough solution. If the window film sticks to itself then you will get a crease through the middle of the film that will not come out (and you will be stuck throwing that piece away and starting over – an expensive mistake)
- Place the Gila window film on the window
- Use the squeegee to get all the bubbles out. Work from the middle to the outside edge. Spray solution on the film (this time the non sticky side – the sticky side will already be applied to the window) to allow your squeegee to move easily over the film. Again, use a lot of the solution, it will make your life easier!
- Use the cutting tool (or an exacto knife) to cut the window film to the size of the window. Here is where you take off that “wiggle room” size you left yourself in the first step.
- Squeegee any remaining bubbles. You might have gotten a few bubbles in the side when you cut the film, just squeegee them out using the solution.
The official directions for the Gila window film say that any remaining small bubbles will disappear in a few days although I didn't notice any small bubbles to see if that were true. It also says the window film will become clearer as it dries, but it seemed pretty clear to me from the start.
Click here to sign up for my mailing list and learn more great ways to save money painlessly.


That’s another cutting the energy saver device. Keep it up!